
This post is the second in my series on Electron and React. It covers how React JSX and the browser work together.
I would suggest you read the first part of the series before starting this post. The first part of the series covers the fundamentals of Electron and explains some of the terms and constructs mentioned on this page.
Posts in this series:
- Electron and React, Part 1: How does Electron work?
- Electron and React, Part 2: React JSX and the browser (you are here)
- Electron and React, Part 3: A project template
- Electron and React, Part 4: Inter-Process communication (IPC)
Rendering user interfaces
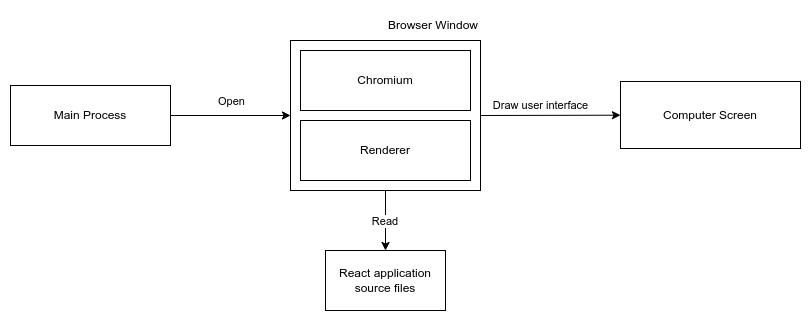
React is used to create user interfaces for the web browser. If you read my previous post in this series, you might remember that the Electron application contains a browser too. An Electron application uses embedded Chromium that powers Electron’s Browser Windows. Just like any web browser, the embedded Chromium reads HTML to draw user interface components.
At its core, React is a software library which generates HTML (and JavaScript and CSS). The HTML can then be “rendered” into panels, buttons, tables and other user interface components using a browser.
Going native
I said above that React is used in a web browser. This is true to a large extent, but you can use React Native to create React components for example Android or iOS applications too. I will not talk about React Native here, since this series concentrates on React and Electron, but I might write about this in upcoming posts.
The Browser Window and the renderer
Terms “component” and “render” are common words, and most people have some kind of understanding about what they mean. However, in the context of Electron they have a very special purpose, which I will cover here.
In Ectron terms a “renderer” is a process which is tightly integrated into the Browser Window and Chromium. You can think about them broadly as follows:
- Chromium is a library, which can draw user interface components on a computer screen
- A renderer is a process running on a computer, which is responsible of drawing the user interface elements according to an HTML document (and optionally according to JavaScript and CSS included in the HTML document) using Chromium
- Together Chromium and the renderer process make a Browser Window, which the Electron Main Process can open
A process what?
A process is a computer program which consumes the computer’s resources in order to perform operations, such as drawing on the computer’s display. Processes usually consume CPU (the computer’s processor) and RAM (the computer’s memory) available in the computer. The computer’s operating system (such as Linux, Windows or MacOS) allocates the available resources to processes running on the computer. One operating system typically runs multiple processes, such as web browsers, Electron processes, text editors, music players or processes internal to the operating system itself.
Renderer who?
To show an user interface for a user, something must draw it on the computer’s screen. While Chromium can draw a button and other user interface components, it must be instructed to do so by something.
You can give Chromium an HTML file with a button tag in it, and Chromium will render it, but there are other ways to create buttons too -for example with JavaScript. Buttons can also be modified or removed with JavaScript either during the page load or later when the user does something in the application.
You can think of the renderer process as something that controls all of this: drawing buttons (and other components) according to a HTML document, later modifying or removing components according to Javascript code running on the page, or styling components using CSS. The renderer process is the “director” of the user interface, and decides on what is displayed to the user. The renderer process is visible in the operating system process list and controls what is displayed on the screen as long as the browser window is open.
A React application inside an Electron application
To understand how a React application might live inside an Electron application, we must first try to find it. After all, there must be something that at least remotely resembles React, since the application is developed using React.
Looking for the source code
If you would grab yourself a copy of an Electron application binary file which uses React and would examine its insides, somewhere in the depths of the binary file you would encounter a large blob of HTML and JavaScript.
On my Linux machine, I can find a file called “app.asar” inside my Electron example application. If I open the asar file and look inside it, I can see a directory which looks like this:
-rw-rw-r-- 1 juha juha 3.3K Jul  2 01:57 548e5c52c412f6fad635deb33277b780.svg
-rw-rw-r-- 1 juha juha  299 Jul  2 01:57 index.html
-rw-rw-r-- 1 juha juha 154K Jul  2 01:57 renderer.js
-rw-rw-r-- 1 juha juha 1.4K Jul  2 01:57 renderer.js.LICENSE.txt
-rw-rw-r-- 1 juha juha 567K Jul  2 01:57 renderer.js.map
-rw-rw-r-- 1 juha juha  733 Jul  2 01:57 style.css
-rw-rw-r-- 1 juha juha 1.5K Jul  2 01:57 style.css.map
This looks promising. Opening renderer.js shows me a file which starts like this:
/*! For license information please see renderer.js.LICENSE.txt */
!function(e,t){if("object"==typeof exports&&"object"==typeof module)module.exports=t();else if("function"==typeof define&&define.amd)define([],t);else{var n=t();for(var r in n)("object"==typeof exports?...
I have truncated the output here, since the file has approximately 154 000 characters. My example application is a minimal one. More complex applications might have millions or tens of millions characters.
The output does not tell me much, but if I look into the untruncated code hard enough, I can find this inside the sea of JavaScript
window.electron.ipcRenderer.sendMessage("ipc-example",["ping"])
This is actually from my application. It is the ping method from electron-react-boilerplate which I used to build my example application.
These are my application source files, as I called them in the last chapter’s diagram.
The fact that I found HTML and JavaScript inside an Electron application makes sense, since Browser Window’s Chromium is a browser, embedded or not, and needs HTML to work. The reason the HTML and JavaScript look like a mess is that they were “bundled”.
Bundling
Bundling means taking source files suitable for humans and rewriting them to be suitable for a browser (or the Browser Window in case of Electron).
We developers prefer our HTML and JavaScript files to be clearly structured and have descriptive variable and function names. Otherwise the source files would be hard to read and understand. The browser, on the other hand, does not care much about the format of the HTML and JavaScript it reads. The browser is happy as long as the source files are syntactically correct HTML and JavaScript. This means the JavaScript browser understands can look like this:
function l_(o,l,n){console.log(o,l,n)}
If you would write the same function in human-readable format, it could look something like this:
function logValues(timestamp, severity, message) {
    console.log(timestamp, severity, message);
}
The readability difference is considerable, even if the example is a simple one. There are a few reasons why source files are minimised in this manner, but the most important one is performance.
Performance effects
Performance effects of an application can be divided into two major categories: load time and memory consumption. The load time is a major factor for web applications running on the internet: the larger and the more numerous the application source files are, the longer it takes to load them from a web server to a browser running on the user’s computer. This affects user experience and, for example, how high search engine optimisation algorithms rank a web page.
Load time is a lesser of a problem for React applications running with Electron, since the source files are usually loaded from a local disk, where the loading times are much quicker. However, Electron applications have notoriously had issues with excess memory consumption. Additionally, a larger application footprint also affects the speed of the application.
Bundlers’ tasks
Minimising source code is one of the tasks a bundler (such as Webpack) does. Bundlers are programs which perform various tasks during the bundling process. Most important ones usually are:
- Combining source code files
- Removing dead (unused) source code
- Minimising source code
- Transpiling source code
Bundling is a complex process, and each of the above tasks would probably merit a post of their own. From this post’s point of view, I will cover only two with more depth: minimising and transpiling source code
- Minimisation is an example of code optimisation which makes your application start faster and perform better
- Transpilation explains how you can create your application using a code format that is fast and easy to write but which the browser would not normally understand
A quick summary of other optimisation tasks
Combining source code and removing unused source code are also integral parts of code optimization, but explaining them in this post would send us down a pretty deep rabbit hole, and the context of this post would explode. For now, I will summarise each quickly before moving on to transpilation.
- When optimising the source code, the bundler reads your source code files and combines them into one or more “output” files. The browser will load these output files when the application starts. When a browser loads the output files, it must first create a connection to the server hosting the files, and then transfer the file contents. If the browser needs to load less files, it also needs to spend less time on establishing connections to the server. This makes the application start faster
- Some of the source code in your project might not be actually used when the application loads. Reasons for this are plenty: you forgot to delete some of your unused functions or a dependency might not be fully optimised. Making the browser load code that is not going to be used consumes time, which can be saved by removing the unused code
A simple React application
I have written a simple “Hello world” React application below. You could render it in Firefox, Google Chrome or other Chromium-based browsers, such as Brave or Microsoft Edge.
<!DOCTYPE html>
<html>
  <head>
    <title>Hello, React!</title>
    <script src="https://unpkg.com/react@17/umd/react.development.js"></script>
    <script src="https://unpkg.com/react-dom@17/umd/react-dom.development.js"></script>
    <script src="https://unpkg.com/@babel/standalone/babel.min.js"></script>
  </head>
  <body>
    <div id="root"></div>
    <script type="text/babel">
      const Hello = () => (
        <div>
          <h1>Hello, React!</h1>
        </div>
      );

      ReactDOM.render(<Hello />, document.getElementById('root'));
    </script>
  </body>
</html>
In this example application, I have created a simple React component called “Hello”, which writes “Hello, React!” on the screen. I have also asked React to draw the component into an element in my HTML document with id “root”.
Don’t worry if you do not understand every detail in the example, you will when you start working with React. For now, I would like to draw your attention to four things in the example application:
- On line 10, I have written a div element in my HTML which has id “root”
- On line 18, I render a “Hello” tag into the “root” div, but “Hello” is not a valid HTML tag.
- The definition of Hello on lines from 12 to 16 is not valid JavaScript -instead it looks like a weird mess of HTML and JavaScript
- The HTML script element on line 11 has type attribute with value “text/babel”
This file is JSX, which is a mix of HTML and JavaScript. React recommends this format for React applications. By default, browsers will not understand JSX: it must be transpiled into valid HTML and JavaScript first. This means a transpiler (such as Babel) must be used.
Transpiling JSX
You can use transpilers in various ways, for example from command line or by using them as a library in your build scripts. In my example I used Chromium’s internal Babel support which is enabled via the “text/babel” type attribute on the script tag.
A kind request
Please do not use the internal Babel support for Chromium for anything else than development-time tasks. If you used a React project template or created your react application with the React cli, you already have a bundler with production-ready transpiler in your application.
If you would transpile the example from the previous chapter to proper HTML and JavaScript, it could look something like this:
<!DOCTYPE html>
<html>
  <head>
    <title>Hello, React!</title>
    <script src="https://unpkg.com/react@17/umd/react.development.js"></script>
    <script src="https://unpkg.com/react-dom@17/umd/react-dom.development.js"></script>
  </head>
  <body>
    <div id="root"></div>
    <script>
      'use strict';

      var Hello = function Hello() {
        return React.createElement(
          'div',
          null,
          React.createElement(
            'h1',
            null,
            'Hello, React!'
          )
        );
      };

      ReactDOM.render(React.createElement(Hello, null), document.getElementById('root'));
    </script>
  </body>
</html>
If you look at the code closely, you see that a few things have changed:
- The code looks more complicated
- The head section is missing one script tag which deals with babel
- The script tag no longer has “text/babel” type
This application is now valid HTML and JavaScript and any modern browser will understand it. And since we no longer need to transpile the code, we no longer need Babel either.
Optimising transpiled JSX
If you would further compact the format, like we discussed earlier in this post, our example application could look something like this:
<!DOCTYPE html>
<html>
  <head>
    <title>Hello, React!</title>
    <script src="https://unpkg.com/react@17/umd/react.development.js"></script>
    <script src="https://unpkg.com/react-dom@17/umd/react-dom.development.js"></script>
  </head>
  <body>
    <div id="root"></div>
    <script>
      "use strict";var Hello=function(){return React.createElement("div",null,React.createElement("h1",null,"Hello, React!"))};ReactDOM.render(React.createElement(Hello,null),document.getElementById("root"));
    </script>
  </body>
</html>
This is also valid HTML and JavaScript, but the code is even harder to understand. This application had only a small number of code lines, real world applications could have hundreds of thousands or millions code lines bundled in a similar manner. The browser will not mind this, however: it is happy to load the code since it is valid HTML and JavaScript.
Wrapping up
If you look at a react application inside an Electron binary, it probably looks nothing like the code you have written in your code editor. You wrote your React application in JSX, but the browser does not understand it. The browser understands only HTML and JavaScript (and CSS).
Before your application can be used in a browser, you must transpile your JSX to valid HTML and Javascript. You can also optimise your transpiled code further to make it load faster, however this is not required. These steps happen during the bundling phase of your application. Terminology differs here a bit: some call it packaging or compiling, but at the end of the day they all mean roughly the same.
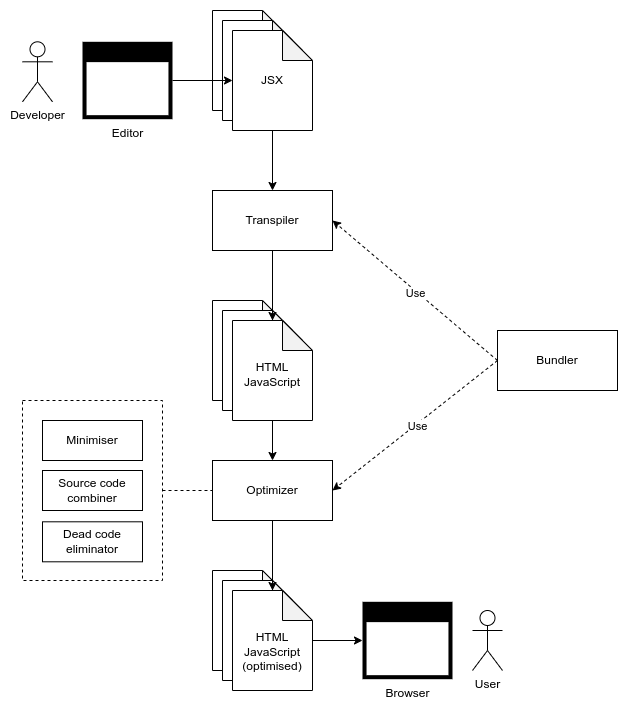
The diagram below outlines the overall code flow from the developer to the user’s browser:
Closing thoughts
This time I had to go a bit more technical, I however hope that I could explain the topics with reasonable clarity. If you already understand Electron development, Webpack and babel, you might think that I left big parts out from the post. This is true. I want to keep this series on a fundamental level, which I hope makes it more accessible to new developers. I will probably cover the topics more in-depth after I finish this “introductory” series.
You might also notice that I omitted CSS handling almost completely in this post. I did this on purpose, since it would again expand the scope of this post. Additionally it would produce little additional benefits, if we think about the optimisation and transpilation process.
It is true that most applications will end up using something like SASS to manage application styles, but React has reasonable alternatives for this. Adding SASS into the application would also be just a matter of bundler configuration. It would not explain much compared to JSX transpiling. I decided to leave it out because of this, and just mention CSS in a few places in the post.
If you would like me to write more about SASS and CSS preprocessors, please leave me a comment!
What’s next?
My next post is about developing a simple project template, which you can use to start your own Electron-React project. You can find the post here: Electron and React, Part 3: A project template.
I Would appreciate your feedback! Did I manage to explain the topic well? Did I miss something? Is there a topic you would like to read about? Leave me a comment below – and a big thank you for reading my post!