
This post is the third in my series on Electron and React. In this post I will create a simple project template (or a “react electron boilerplate”) that implements topics discussed in the previous posts in the series.
I would suggest you read the previous parts of the series before reading this post. The first part of the series covers the Electron fundamentals and the second part explains how React applications can be rendered in browsers.
I also assume that you understand React and JSX on a basic level. If you do not, I recommend you to read at least the basics from React documentation.
Posts in this series:
- Electron and React, Part 1: How does Electron work?
- Electron and React, Part 2: React JSX and the browser
- Electron and React, Part 3: A project template (you are here)
- Electron and React, Part 4: Inter-Process communication (IPC)
For the impatient
The project repository is available in Github: https://github.com/jlundan/electron-react-example. If you want to jump right to it, feel free to do so. However, I would recommend you to read through this post, where I will walk through the example and explain a few things which might not be self explanatory.
An evolving repository
Electron-react -example changes over time, which means the repository’s source code in the main branch might not look exactly like the snippets on the page. If you wish to restore the repository to the state it was when this post was written, you can use the v1.0 version. If you cloned the repository, you can checkout v1.0 tag with git.
A bit of terminology
Before we start, a bit of terminology I will be using during this post:
- Renderer developer files: these are the renderer related files you edit with an editor in the src/renderer directory in the electron-react-example project
- Renderer application source files: these are transpiled and bundled from the renderer developer files
- Main process developer files: these are the main process related you edit with an editor in the src/main directory in the electron-react-example project
- Main process application source files: these are transpiled and bundled from the main developer files
Additionally, I will use compound terms:
- Developer files: all developer files (renderer developer files + main process developer files)
- Application source files: all application source files (renderer application source files + main process application source files)
These are to make a distinction between two very different “source file” concepts: one that involves the source files you edit, and one that involves the transpiled and bundled source files used by the BrowserWindow and packaging scripts.
You will also hear me use the term “application binary“, this refers to the file which you would deliver to your users. On Linux it can be an AppImage or on Windows, it can be an exe file.
Developing an Electron application
When developing an Electron application, you usually need to do two things:
- Develop the application features on your developer machine
- Package and deliver the application to your users
Developing the application usually involves making some changes to the developer files and observing the changes in the running application. This is an iterative process, which means you will most likely repeat it multiple times during the development. Iteration should be as fast as possible to save you time.
Packaging happens less often, and speed is often a minor concern (although the faster the better). Packaging is often automated.
This post will cover both: I will present tools and steps for iterating the application development and packaging the application. Packaging automation is not implemented, although I might add it later.
The application
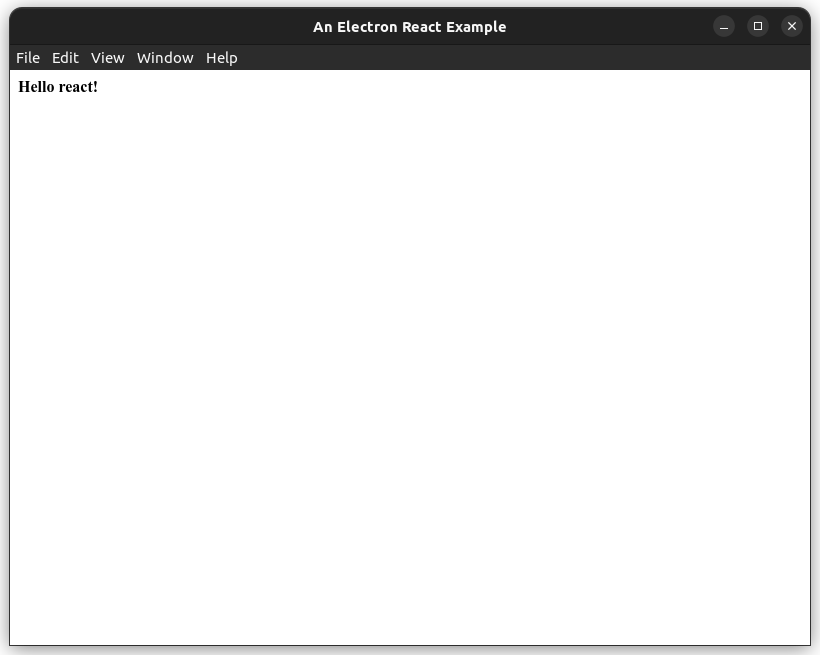
The application in the project template is pretty simple (for now), it will render “Hello react!” on the screen with bold text. I will develop the application further in upcoming posts.
The React application contains four files, I have provided a short description for the files below. All files are located in the src/renderer directory in the project repository.
index.html
<!DOCTYPE html>
<html lang="en">
  <head>
    <meta charset="utf-8" />
    <meta
      http-equiv="Content-Security-Policy"
      content="script-src 'self' 'unsafe-inline'"
    />
    <title>An Electron React Example</title>
  </head>
  <body>
    <div id="root"></div>
  </body>
</html>
This is a pretty standard HTML5 document. We define a few security policies to limit where JavaScript can be loaded. You can find more information on Content Security Policies here. Here we limit the JavaScript to scripts that are loaded from the same origin as the HTML page and inline <script> tags. Setting Content Security Policies is not mandatory, but a good practice.
index.jsx
import React from 'react';
import { createRoot } from 'react-dom/client';
import App from './App.jsx';

const container = document.getElementById('root');
createRoot(container).render(<App />);
The index.js file will be injected to the index.html when the application is run. This will happen via “HtmlWebpackPlugin” which we will cover later on.
The code finds the “root” element (a div element in the index.html) and renders the “App” React component to it.
App.jsx
import React from 'react';
import './App.css';

export default function App() {
    return (
        <div id="hello"> Hello react!</div>
    );
};
The “App” React component is pretty simple: it just renders a single div to the screen with text “Hello react!”. It imports CSS styles from App.css.
App.css
#hello {
    font-weight: bold;
}
In our styles, we bold the “hello” element (the div in App.jsx).
The development environment
Before you start:
You can read the template project files in your browser, but I would recommend you to download the template project to your machine for easier access by cloning the repository or downloading the project as a zip file. I would strongly recommend using a Linux-like environment for developing Electron applications: either a real Linux OS (such as Ubuntu), WSL for Windows or MacOS.
To run electron-react-example, you will need to install NodeJS on your developer machine.
You also need to run “npm install” in the downloaded or cloned repository to install the NodeJS dependencies for the project.
Running NPM scripts
First I would like you to open the package.json file in the template project and look at the scripts block in it:
...
  "scripts": {
    "dev": "concurrently \"npm run dev:renderer\" \"npm run sleep && npm run dev:main\"",
    "dev:renderer": "webpack serve --config webpack.renderer.dev.config.js",
    "dev:main": "cross-env NODE_ENV=development electronmon src/main/main.js",
    "package": "npm run bundle:main && npm run bundle:renderer && electron-builder",
    "bundle:main": "cross-env NODE_ENV=production webpack --config webpack.main.prod.config.js",
    "bundle:renderer": "webpack --config webpack.renderer.prod.config.js",
    "clean": "rimraf release/app/main release/app/renderer release/build",
    "sleep": "node -e \"setTimeout(() => process.exit(0), 2000)\""
  },
...
These scripts can be invoked from the command line with npm run <script> (please remember to run npm install before doing this, otherwise the scripts will fail).
Starting the development environment
To start the development environment, type:
npm run dev
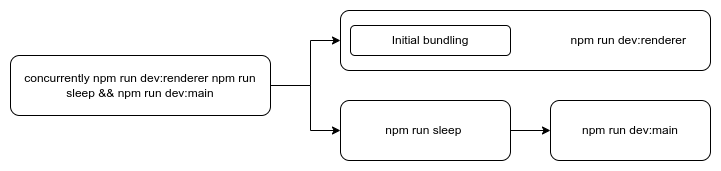
This will run the dev script. The script uses a command called “concurrently” which is a dependency for the project.
...
  "devDependencies": {
...
    "concurrently": "8.2.0",
...
Concurrently starts two commands in parallel:
- npm run dev:renderer
- npm run sleep && npm run dev:main
The latter consists of two commands itself: npm run sleep and npm run dev:main which are executed in sequence.
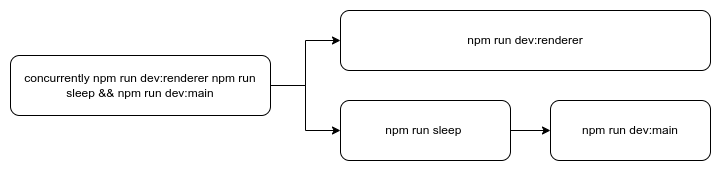
You can find dev: renderer, sleep and dev:main scripts in the same package.json “scripts” block.
- dev:renderer starts webpack with command “serve”, which acts as a web server to host files over the HTTP protocol
- dev: main starts electronmon which allows you to run electron applications and restart the application when main process developer files change
- sleep: runs a node command which sleeps for two seconds (2000 milliseconds). We will revisit this script later on
Both Webpack and Electronmon are listed in the same dev dependency block than the dependency “concurrently” was. This allows them to be used in the NPM scripts as commands.
Developing the main process and the renderer
If you read the previous parts of this series, you might remember that we have discussed the main process and the renderer before. Main process controls the application and renderer draws the UI with the BrowserWindow (Chromium). We will provide concrete implementations for both next.
Running the main process
The main process is started with dev:main script which looks like this:
...
"dev:main": "cross-env NODE_ENV=development electronmon src/main/main.js",
...
As stated, electronmon is a tool which allows you to run electron applications and restart the application when main process developer files change. Cross-env is a tool which allows you to set environment variables in a way that they work on Windows too. We will come back to the “NODE_ENV” environment variable later on.
If you look at the src/main/main.js file (which the electronmon starts), you will see
const { app, BrowserWindow } = require('electron')
const {URL} = require("url");
const path = require("path");

app.on('window-all-closed', () => {
    if (process.platform !== 'darwin') {
        app.quit()
    }
});

app.on('activate', () => {
    if (BrowserWindow.getAllWindows().length === 0) {
        (async() =>{await createWindow()})();
    }
});

(async () => {
    await app.whenReady();
    await createWindow();
})();

async function createWindow (){
    const win = new BrowserWindow({
        width: 800,
        height: 600,
        icon: path.join(__dirname, '..', '..', 'assets', 'icons', '128x128.png'),
    })
    await win.loadURL(
        process.env.NODE_ENV === 'development' ? getDevelopmentFileUrl() : getProductionFileUrl()
    );
}

function getDevelopmentFileUrl() {
    return new URL(`http://localhost:${process.env.PORT || 3000}/index.html`).href
}

function getProductionFileUrl () {
    return `file://${path.join(__dirname, '..', 'renderer', 'index.html')}`;
}
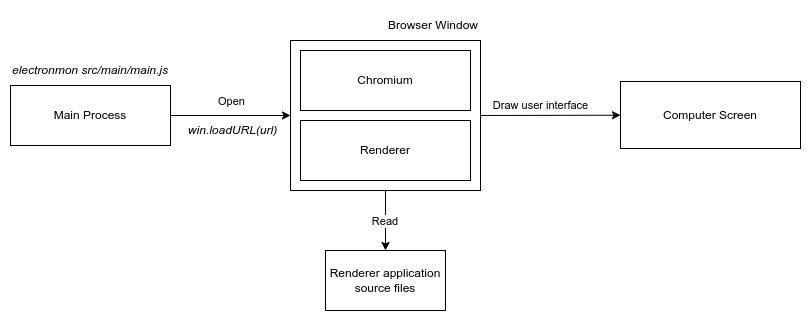
The src/main/main.js is effectively our Main Process, which creates the BrowserWindow and calls its loadURL method to tell where the renderer application source files are. Picture below might be familiar to you from my previous posts. I have mapped the concrete topics we just discussed to the more abstract concepts introduced in the earlier posts in this series.
Handling application windows on MacOS
On lines 5 and 11 in src/main/main.js the code declares few event handlers to deal with application lifecycle. The code quits the application when all windows are closed, unless we are on MacOS where applications tend to remain running even when application windows are closed. Clicking on the MacOS dock then re-opens the application window.
Opening the BrowserWindow
To open the BrowserWindow the code awaits the Electron application to become ready before calling createWindow function on lines 18 and 19. The BrowserWindow is created on line 23 and the HTML file url is loaded on line 28.
The win.loadURL function tells the BrowserWindow where to load the renderer application source files. If you remember the somewhat confusing explanation of the Renderer process in previous parts of this post series, we can give that a concrete definition here. The renderer process is the HTML file and all JavaScript code attached to it in the renderer application source files. I will cover this with more detail later in this post. Before that, we have to still figure out where the renderer application source files come from.
Providing an URL for the BrowserWindow
The code uses the environment variable “NODE_ENV” to determine if we are in a development environment or not. If you look at the dev:renderer script in the package.json, you see that it starts with “NODE_ENV=development”. This means: when we are running npm run dev, the NODE_ENV has value “development”, so win.loadURL calls getDevelopmentFileUrl() to get the URL.
If you look at the getDevelopmentFileUrl function, you can see that it returns an URL pointing to an index.html file available at localhost on port 3000 (unless PORT environment variable would be set to something else, which in our case is not). BrowserWindow can now go ahead and load the HTML document -as soon as we figure out how to spin up the HTTP server to serve the files we need.
Serving renderer application source files
The renderer application source files are served via Webpack dev server, which is a process you started when you ran “dev:renderer” as part of the “dev” NPM script.
...
"dev:renderer": "webpack serve --config webpack.renderer.dev.config.js"
...
I have further modified the picture we brought in earlier to complete the development environment setup.
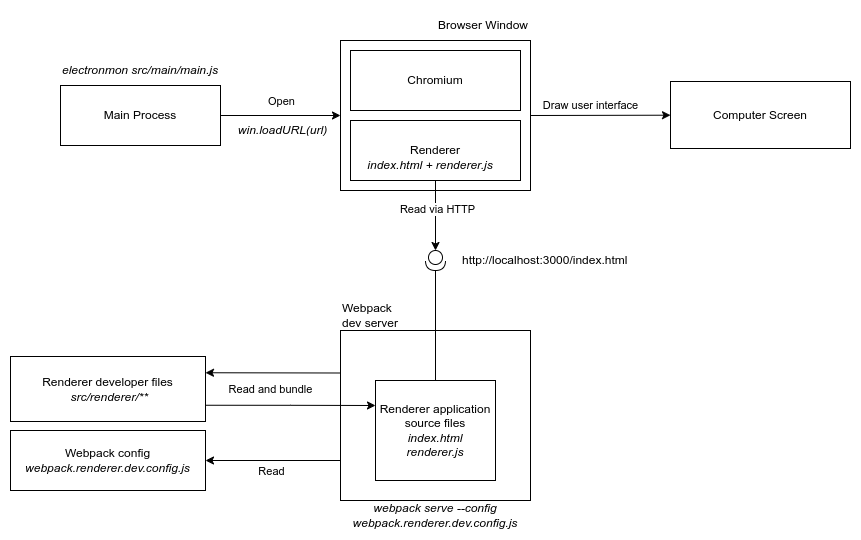
Webpack dev server reads the developer source files from src/renderer/ directory and bundles then. The bundled files are the renderer application source files we discussed earlier. With electron-react-example, they are:
- index.html which acts as an entry point to the renderer process
- renderer.js which is a bundled JavaScript file referenced in the index.html. Renderer.js further complements the renderer process by providing logic to draw the user interface
In fact, most of the logic to draw the user interface comes from renderer.js, the index.html does very little. However, these files together define how the user interface looks and operates, therefore they together are the “renderer” process.
The dev server keeps the bundled files in memory and makes them available via port 3000. This allows the BrowserWindow to load the files and render the UI in your Electron application window.
Listing the in-memory bundled files
Since the Webpack dev server keeps all files in memory, you cannot see them in your filesystem. If you need to see a list of bundled files the dev server has, you can open a browser (proper one, not a BrowserWindow) to http://localhost:3000/webpack-dev-server. This shows a list of bundled files the dev server has available.
Why do we need a HTTP server?
You might ask: “can I just serve the files from the filesystem?”. Yes you could, in fact we do serve them like that in the packaged application (more on that later). However, if you would do that, you would have to bundle your application source files and reload your application window every time you change the developer files to reflect the changes in your running application. This would be extremely cumbersome, since you would be doing that a lot. Sometimes you might forget to reload the application and wonder why your bugfix didn’t work: it did – your application was just running outdated code.
Synchronising the renderer and main processes with sleep
I promised to come back to the sleep NPM script used by the dev script
npm run dev starts two scripts running in parallel:
- dev:renderer, which starts Webpack dev server, which in turn serves the renderer application source files
- dev:main, which starts the main process which electronmon, which in turn creates the BrowserWindow, which then loads the (bundled) renderer application source files
The problem is, it takes some time for the Webpack dev server to bundle the renderer application source files and make them available via HTTP. The main process starts up faster, which means the BrowserWindow might open before the Webpack dev server has had time to bundle the renderer application source files. This usually results in an empty Electron application window, since the renderer process is not ready yet. To overcome this, we sleep (wait) a few seconds before starting the main process, so Webpack has time to complete the initial bundling.
...
"sleep": "node -e \"setTimeout(() => process.exit(0), 2000)\""
...
You might want to update the sleep time if your webpack bundling is slower. The needed sleep time depends on the speed of your development computer.
Configuring Webpack for development
Before Webpack can be used in the development environment, it needs to be configured to do so. The configuration (webpack.renderer.dev.config.js) looks like this:
const HtmlWebpackPlugin = require('html-webpack-plugin');

module.exports = {
    mode: 'development',
    devtool: 'inline-source-map',
    entry: './src/renderer/index.jsx',

    output: {
        filename: 'renderer.js'
    },

    module: {
        rules: [{
            test: /\.(jsx)$/,
            exclude: /node_modules/,
            use: [{
                loader: 'babel-loader',
                options: { presets: ['@babel/preset-env', '@babel/preset-react'] }
            }]
        }, {
            test: /\.css$/,
            use: [{
                loader: 'style-loader'
            },{
                loader: 'css-loader',
                options: { modules: false }
            }]
        }]
    },

    plugins: [
        new HtmlWebpackPlugin({
            template: 'src/renderer/index.html'
        })
    ],

    devServer: {
        host: 'localhost',
        port: process.env.PORT || 3000,
        hot: true,
    }
};
I will cover the configuration on a high level to keep this post at a somewhat reasonable length. You can read Webpack documentation for more details.
- mode specifies that we are in development mode. This configures webpack to operate in a development environment
- devtool controls how source maps are generated
- output defines where the bundled JS and CSS will be written (we will output everything to renderer.js file)
- module defines how we handle various files we are going to bundle
- We use Babel to handle JSX files
- We use style-loader and css-loader to handle CSS files
- index.html is generated using HtmlWebpackPlugin
- the dev server starts to port 3000 if “PORT” environment variable is not defined
- We enable “hot reloading”, which recreates the bundled application source files when developer source files change
As we discussed in the previous posts in this series, we need to transpile the JSX files we use to implement the React application to JavaScript. We use Babel with two presets (@babel/preset-env and @babel/preset-react) to accomplish this. I will not cover the Babel details in this post, to keep this post at reasonable length. In this post we are content that they can transpile JSX to JavaScript. Please feel free to study their documentation further if you would like to understand them in depth.
CSS in the bundled application source files
You might have noticed that we have a CSS file in the renderer developer files (App.css)
#hello {
    font-weight: bold;
}
but the application source files do not include such a file. This is because the CSS files are actually written into the JavaScript bundle file (renderer.js).
If you open up the http://localhost:3000/renderer.js file in your browser, and look for it, you should see something like this somewhere in the somewhat large file:
...
var ___CSS_LOADER_EXPORT___ = _node_modules_css_loader_dist_runtime_api_js__WEBPACK_IMPORTED_MODULE_1___default()((_node_modules_css_loader_dist_runtime_sourceMaps_js__WEBPACK_IMPORTED_MODULE_0___default()));
// Module
___CSS_LOADER_EXPORT___.push([module.id, `#hello {
    font-weight: bold;
}`, "",{"version":3,"sources":["webpack://./src/renderer/App.css"],"names":[],"mappings":"AAAA;IACI,iBAAiB;AACrB","sourcesContent":["#hello {\n    font-weight: bold;\n}"],"sourceRoot":""}]);
...
The cryptic snippet includes our “#hello” definition. Webpack has bundled the CSS into the JavaScript file, and will insert it into the HTML page DOM when the bundle is referenced from the index.html in renderer application source files
<!DOCTYPE html>
<html lang="en">
  <head>
    <meta charset="utf-8" />
    <meta
      http-equiv="Content-Security-Policy"
      content="script-src 'self' 'unsafe-inline'"
    />
    <title>An Electron React Example</title>
  <script defer src="renderer.js"></script></head>
  <body>
    <div id="root"></div>
  </body>
</html>
Don’t worry if you do not understand the syntax Webpack uses. Just be aware that the CSS files are compiled into the renderer.js.
Summing up the development environment
Our development environment is based on three major tools
- electronmon starts the main process (which in turn opens up the BrowserWindow)
- webpack reads the renderer developer files, bundles them to application source files, and makes them available for the BrowserWindow to load
- babel is used with Webpack to transpile JSX files into JavaScript, so that the BrowserWindow can understand the files
Both Electronmon and Webpack reload the application when developer files change, which allows the changes you made to be reflected in the running application automatically. The speed of the reload should be sufficient for our electron-react-example, but as the application grows more complex, the speed might suffer. Webpack has mechanisms to tackle these, but I will not cover those in this post.
I recommend you to experiment with the template repository and make yourself familiar with it. The development setup is somewhat complicated, but I hope I have explained it well enough! Please feel free to leave a comment if you feel I didn’t explain something properly.
This wraps the development environment setup, but we still need to package the application. Let’s work on that next.
Production builds and packaging
Packaging the application is a simple process in many ways:
- You do not need to spin up “dev servers” to satisfy development iteration needs
- You do not need to worry about “hot reloading” the application
However, packaging an Electron application is not always straightforward. The packaging requirements depend heavily on the platform you are targeting and the medium you wish to use to distribute your application. For example, distributing your application via the Microsoft Store requires you to sign your application. Apple requires you to notarize your applications in a similar manner, but with a different mechanism. I will not cover code signing in this post. Instead I will provide a simple packaging configuration for Linux and Windows without code signing using electron-builder which is listed in electron-react-example development dependencies.
Packaging for production
To package the application, you would invoke the “package” script in package.json
...
"package": "npm run bundle:main && npm run bundle:renderer && electron-builder",
"bundle:main": "cross-env NODE_ENV=production webpack --config webpack.main.prod.config.js",
"bundle:renderer": "webpack --config webpack.renderer.prod.config.js",
...
The script executes three commands in sequence
- npm run bundle:main, which in turn invokes webpack with webpack.renderer.prod.config.js to create main process application source files
- npm run bundle:renderer, which in turn invokes webpack webpack.main.prod.config.js to create renderer application source files in your filesystem
- electron-builder, which reads the application source files and creates the application binary which then can be shipped to your users
npm run bundle:main sets “NODE_ENV” to “production”, so that our src/main/main.js script knows to load the renderer application source files from a local filesystem instead of an HTTP server. In fact any value besides “development” would do, but I like to be descriptive.
...
await win.loadURL(
    process.env.NODE_ENV === 'development' ? getDevelopmentFileUrl() : getProductionFileUrl()
);
...
function getProductionFileUrl () {
    return `file://${path.join(__dirname, '..', 'renderer', 'index.html')}`;
}
...
Filesystem layout for packaging an Electron application
While the packaging itself is pretty easy with electron-builder, getting various output and input directories right might be tricky. There are many ways you can configure your packaging directories, the ones configured for electron-react-example are as follows:
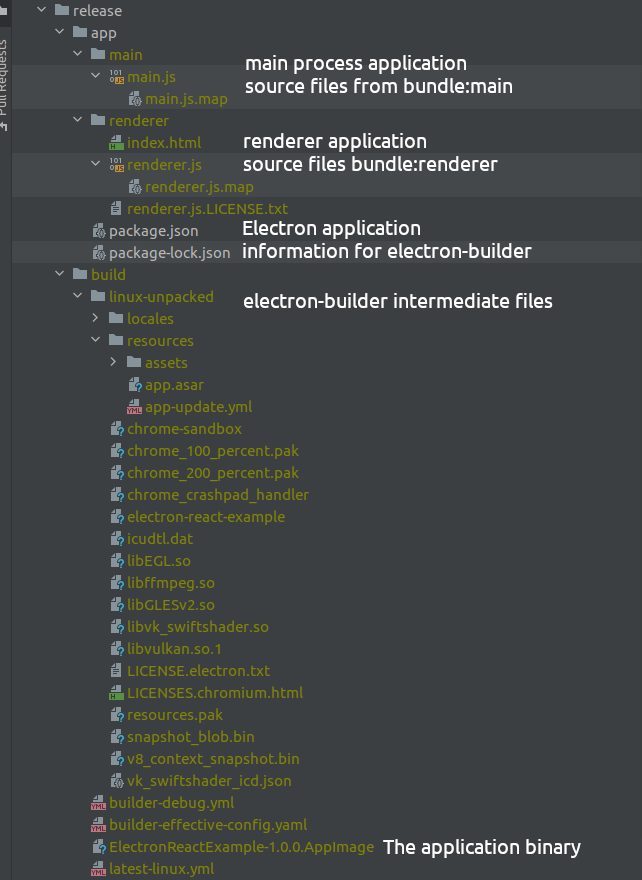
- main process application source files are stored in release/app/main directory
- rendererer application source files are stored in release/app/renderer directory
- packaging results are created in release/build directory
Configuring the layout
The configuration for the above layout is found in the package.json at the root directory of the project.
...
"build": {
    "productName": "ElectronReactExample",
    "appId": "com.stuckpointer.electron-react-example",
    "asar": true,
    "files": [
      "main",
      "renderer",
      "package.json"
    ],
    "linux": {
      "target": [
        "AppImage"
      ],
      "category": "Development"
    },
    "win": {
      "target": [
        "nsis"
      ]
    },
    "directories": {
      "app": "release/app",
      "buildResources": "assets",
      "output": "release/build"
    },
    "extraResources": [
      "./assets/**"
    ]
  },
...
- productName defines the name of our app, it will be used to name the application binary file
- appId provides unique id for our app
- asar turns asar packaging on. This creates an app.asar archive in the build directory, which solves some common issues for example with long file names on Windows. You can turn this off, in which case a normal directory is created in the release/build folder instead of the app.asar archive. I would recommend you to leave this turned on, unless you temporarily need to see what goes into the app.asar archive
- directories and extraResources define where the files we want to include in the application binary should be loaded from and where the electron-builder outputs should go
- app files should be loaded from release/app
- intermediate files and the application binary should be written into release/build
- application resources should be loaded from assets directory. Electron-react-example uses assets directory mainly to specify the application icons. Electron-builder documentation is a bit lacking when it comes to buildResources configuration, but it seems the application default icon is set using it (at least on some operating systems). ExtraResources generally allows us to bring various assets into the build. Since we specify the a icon path in src/main/main.js when we create the BrowserWindow, we need to bring the assets as extraResources into the app
- files define the files and directories in the “app” directory (release/app) we would like to include in the application binary (assets are included automatically)
- main directory includes the main process application source files
- renderer directory includes the renderer application source files
- package.json in the release/app/ directory contains a “main” field, which points to ./main/main.js. This tells Electron that the main.js file should be processed when the application is started
- linux and win specify the supported operating systems for packaging. Linux and Windows are supported currently.
You can find more information about the options in electron-builder documentation.
About packaging paths
You might be a bit confused about the various paths related to the packaging. Let me try to explain a bit more. If I open the electron application binary on my machine (on Ubuntu I can just rename the ElectronReactExample-1.0.0.Appimage file to ElectronReactExample-1.0.0.zip and open it with an archive manager), its contents look like this
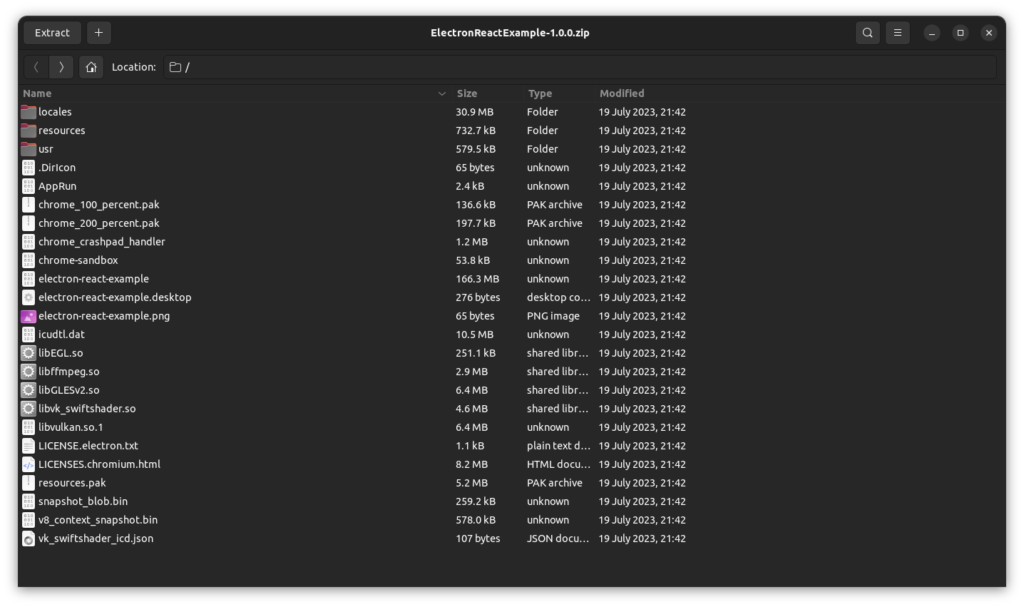
This looks pretty much similar to our release/build directory after packaging (you can run the “package” script with NPM to populate the build directory). If we open the resources directory, we find the app.asar file.
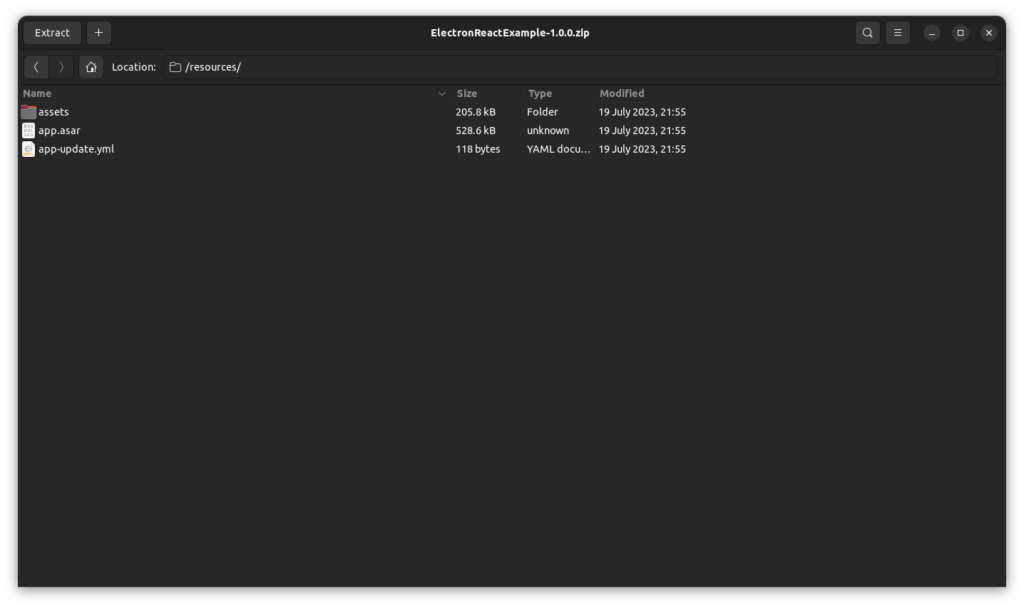
This is actually where our application source files are located. If I extract the app.asar into my filesystem and examine its contents:
➜  Temp cd asar
➜  asar ll
total 520K
-rw-rw-r-- 1 juha juha 517K Jul 19 21:55 app.asar
➜  asar npx asar extract app.asar ./unpacked
➜  asar ll
total 524K
-rw-rw-r-- 1 juha juha 517K Jul 19 21:55 app.asar
drwxrwxr-x 4 juha juha 4.0K Jul 19 22:01 unpacked
➜  asar cd unpacked
➜  unpacked ll
total 12K
drwxrwxr-x 2 juha juha 4.0K Jul 19 22:01 main
-rw-rw-r-- 1 juha juha  235 Jul 19 22:01 package.json
drwxrwxr-x 2 juha juha 4.0K Jul 19 22:01 renderer
You can see that files we specified in package.json to be included in the application binary are there. When the application starts, Electron reads the package.json inside the app.asar, finds out that the main script is located at main/main.js, and starts the application.
Generating application source files for electron-builder
In order the electron-builder have something to copy to the application binary, we have to create the application source files in the directory we have configured as “app” directory. Electron-builder will copy these files to the release/build directory, from where they will go into the application binary.
If we quickly revisit the package NPM script, you might already figure how this will go.
...
"package": "npm run bundle:main && npm run bundle:renderer && electron-builder",
"bundle:main": "cross-env NODE_ENV=production webpack --config webpack.main.prod.config.js",
"bundle:renderer": "webpack --config webpack.renderer.prod.config.js",
...
We use Webpack to generate application source files for the renderer and the main process. The config files determine how we generate the files. webpack.main.prod.config.js looks like this:
const path = require("path");

module.exports = {
    mode: 'production',
    devtool: 'source-map',
    target: 'electron-main',

    entry: {
        main: "./src/main/main.js"
    },

    output: {
        path: path.join(__dirname, 'release', 'app', "main"),
        filename: 'main.js',
        library: {
            type: 'umd',
        },
    },

    optimization: {
        minimize: true,
    }
};
The configuration specifies that we read the ./src/main/main.js and write a bundle created from it (with the same name) into the release/app/main directory. We also minimise the output.
webpack.renderer.prod.config.js looks like this:
const HtmlWebpackPlugin = require('html-webpack-plugin');
const path = require("path");

module.exports = {
    mode: 'production',
    devtool: 'source-map',
    target: ['web', 'electron-renderer'],

    entry: './src/renderer/index.jsx',

    output: {
        path: path.join(__dirname, 'release', 'app', "renderer"),
        filename: 'renderer.js',
        library: {
            type: 'umd',
        },
    },

    module: {
        rules: [{
            test: /\.(js|jsx)$/,
            exclude: /node_modules/,
            use: [{
                loader: 'babel-loader',
                options: { presets: ['@babel/preset-env', '@babel/preset-react'] }
            }]
        }, {
            test: /\.css$/,
            use: [{
                loader: 'style-loader'
            },{
                loader: 'css-loader',
                options: { modules: false }
            }]
        }]
    },

    plugins: [
        new HtmlWebpackPlugin({
            template: 'src/renderer/index.html'
        })
    ],

    optimization: {
        minimize: true,
    }
};
This looks pretty similar to the config we used when we set up the developer environment, except this time we specify the output. We read the ./src/renderer/index.jsx and output the bundle at release/app/renderer.
Since we needed to fill in two directories (main and renderer) under release/app, which we have done, we can now call electron-builder to create the application binary. And with that, we should be done! The release/build should (finally) contain your application binary file.
Packaging for an operating system
Electron-react-example supports packaging for Linux and Windows. To specify which operating system to build on, you would use command line switches
npm run package -- --linux
builds an application binary file for Linux and
npm run package -- --win
builds an application binary file for Windows
The arguments map to entries in the build section in the package.json at the root of the project. You can add more operating systems (or archive/binary formats) into the package.json.
Summing up the packaging
The paths related to packaging an Electron application can be a bit confusing, but hopefully I explained them well enough. Please leave a comment if I didn’t!
Packaging an Electron application can be split into two phases:
- Using webpack to generate bundled application source files in known directories
- Configuring the directories into electron-builder and triggering it
Electron-builder can build application binary files for multiple operating systems and binary/archive formats. You can configure these in the package.json and select the correct one with command line switches given to the package NPM script.
If you need to sign your application, please consult the electron-builder documentation, since the signing process is a bit different for each medium to deliver your application.
Closing thoughts
This post was a long one, but the topic was a bit complex. I hope I managed to explain the topic well enough. Please leave a comment if you think I missed something!
You might “wow, that was a lot for a simple Hello react”. You are right. However, please keep in mind that the template lays a lot of foundations, which you can build on later on. Developing the React application further now only requires changes to the renderer and main process developer files: everything else is already pretty much in place!
As you might have noticed, I didn’t touch communication between the renderer and the main process at all. I will discuss this in the next post, where I use the example repository introduced in this post and build on top of it. See you there!